
Faster, easier and zero downtime deployments using a blue-green deployment strategy
I’m currently working on an article on how to use YARP to do blue-green deployments. But before I publish that one, I wanted to write about what blue-green deployments are and why it’s a great deployment strategy. Let’s go!
The “classic” approach to deployments
In a classic setup, where you deploy the latest version of your web applications, the deployment process will have some sort of downtime while files get replaced on the server, processes need to restart, etc…
Usually, this means that deployments have to happen outside of business hours or when the number of active users is lowest. We have to plan and put some sort of announcement out so our users know when they’ll be impacted.
Once the deployment has happened, a quick manual test happens. If everything works, the deployment is finished. If something is broken, you check how easy it is to fix. If it can be fixed easily, you fix it right there and then. If the fix is going to take too long, you reverse the deployment and try again tomorrow.
To summarize, “classic” deployments have the following problems:
- You can’t deploy frequently, because every deployment causes downtime and thus has a negative impact.
- You don’t have time to properly test your production release. There’s always something environment-dependent that can break things.
- You can’t deploy whenever you want, which possibly means people need to work outside their regular hours and they’re feeling extra rushed or stressed.
Doesn’t sound like a lot of fun right? But there’s a better way.
Blue-Green Deployments
The goal of blue-green deployments is three-fold:
- To allow you to deploy during any time of the day.
- To allow you to deploy with zero downtime.
- To allow you to validate/test your newly deployed code in a production environment before releasing it to the public.
Let’s find out what we need to be able to achieve this mythical deployment Walhalla.
Multiple identical environments
First, we’re going to need two separate but identical environments:
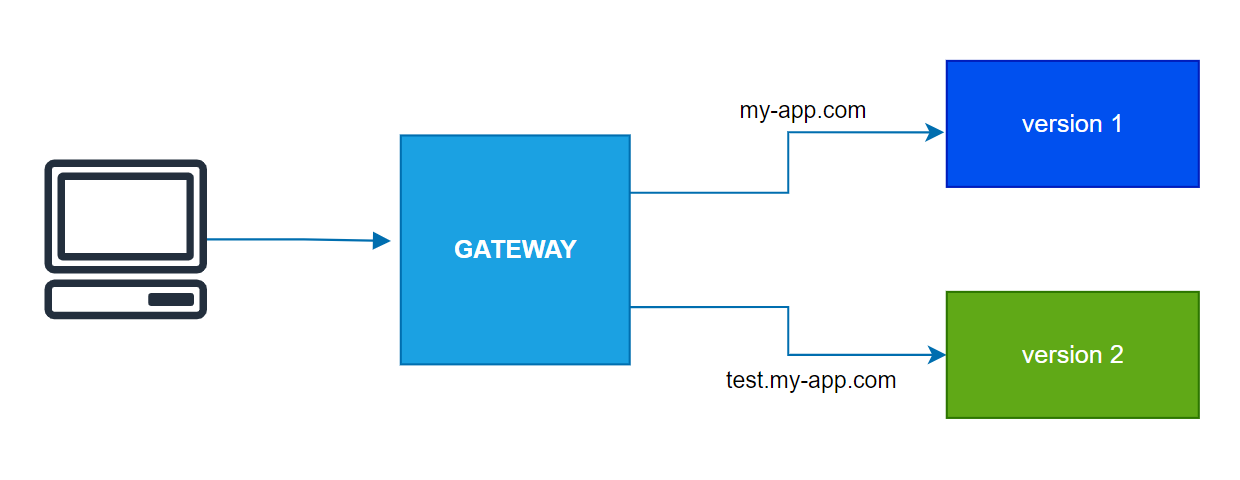
The above example is very basic. Here’s what we see in this image:
- We have a client that connects to a gateway.
- The gateway connects to two separate, but identical environments.
- The blue environment, with the
my-app.comdomain linked to it, is currently used by our end-users. It’s where our application is running in production. - The green environment, with the
test.my-app.comsubdomain, has the latest version of our application on it. Only our developers and testers have access to it.
The first advantage here should be pretty clear: we can test all we want at whatever time we want to. If something is wrong and we need a fix, then we just redeploy to our green environment. Again, this has no impact at all on our end-users, since they’re all in the blue environment.
The above also means that you never do deployments to your ‘live’ environment. Instead, you always deploy to green.
“But how do our end-users get access to my new version then?” you might be wondering. Ah well, there’s a reason that gateway is in that diagram!
The ol’ switcharoo
Now that we have the latest version of our green environment, and we’ve been able to test it completely stress-free, it’s time to give our end-users access to the latest version. This is where the real magic happens: we’re going to swap the environment our end-user is connecting to, without them ever noticing!
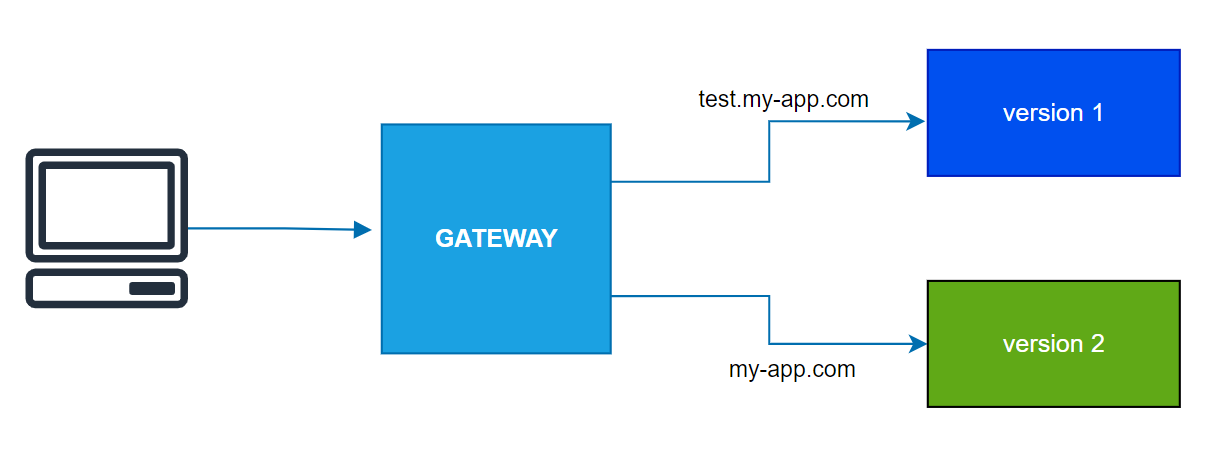
In the above image, we’ve only done a single thing: changed the configuration of our gateway so it forwards our production requests to our green environment. Everything else is still the same as before.
Important to notice, is that we’re not removing our blue environment yet. We want to keep our blue environment in case we missed something during testing and we need to revert. Now is also a good time to keep a close eye on the logs your new version is generating, and especially any unexpected errors that pop up.
In this example, we’re instantly swapping environments for all our users. An even better strategy is to incrementally direct traffic to your new green environment. This allows for some warm-up time for your application, and if something goes wrong fewer users will be impacted.
The Circle of Life
After keeping an eye on the logs, alongside a support mailbox that remains empty, you’ll be able to call your new deployment a success! Pat yourself on the back.
There’s just one last thing to do now:

Notice our green environment, has now turned blue! Nothing to do with feeling blue, it just means it’s been promoted to our stable production environment. Our previous blue environment can now be used to deploy and test version 3 of our application, turning it into our new green environment. As you can see, it already contains version 3 of our application, starting the entire process all over again.
Conclusion
With some minimal setup, you can greatly increase all aspects of your deployment strategy. There’s no need to plan releases weeks upfront or have people working late just to click the deploy button and do some tests. Blue-Green deployments are easy to set up and easy to use. Minimal effort for a huge pay-off. What’s not to love?
In my next article, I’ll show you how you can use YARP as the gateway in this image. We’ll customize our own YARP gateway, so we can automate the entire process. If that sounds interesting to you, why not subscribe or follow me on any of the social media platforms found in the footer?
Thanks for reading! If you would like to stay up-to-date with my blog, consider subscribing to the codecrash newsletter. You'll receive an email whenever I publish a new article.